1.1.12

This post is absolutely full of links. If you click the link above, you will go to Quokka Quilts, run by LAURA, not Linda. On Christmas Day she announced a new contest that I just had to enter. The link will give you all the details. What you see below is my personal journey/entry. The last day to enter is January 15, so if you are interested, stop reading this and follow the first link!

Basically, I had to go to Fat Quarter Shop and select 12 prints and 3 solids. I did that easily--it took about an hour. Then I realized that BATIKS probably do not count as PRINTS or SOLIDS. Does not matter--remember, I already won a contest for 57 batik fat quarters. I rethought my selection.

Much, much later, I had a final decision. Then I had to download PICASA, figure out how to make a collage with "borrowed" pictures from Fat Quarter Shop and make sure I could name them and link to them. TA-DA!


 Most of the fabrics I chose came from Lakehouse Fabrics.

Left to right, top row first:

I chose primary colors! No one is more surprised than I. But I will stick with these. They are cheery and I like them.

12.31.11

A little garment sewing with Simplicity patterns.


What will it be? It is a birthday request from a 1976 Simplicity pattern.

Yes, that pattern cost $1.25.
Usually I only cut out one thing at a time but a couple of days ago I cut out TWO projects in one day. Then I spent the rest of the day reading.  

 The other project is also an apron. It does not look as modern as the 35 year old pattern above but the price sure is current.
 In  the store, you can buy this for $14.95. I make a list of all the patterns I want/ need and when we go into a real city that has patterns for sale, I use my coupons or hope we are there on a day when that particular pattern company is on sale. I only had to part with $1.99 to get the pattern for the apron on the far right of this package. I am making a modification, of course. I can never leave well-enough alone. My shoulder straps will be more streamlined since I deleted the scallops. And the applique'.


The fabric for the big apron is a two strong pinks on brown. I have bias tape in the same shade as the darker pink to make the finishing touches. I decided to make an apron because I can not bring myself to wear a bib while I eat. Ironically, the only thing this apron does not cover is the place I usually spill my food.  I will probably have to wear a bib anyway.


12.30.11

Two meetings on one day at the same time in two different churches. Next Thursday, my OASIS classes resume. I will be taking chair caning as well as Intermediate II basketry. Unfortunately, that is when Fiber Active (through the Misty Mountain Quilt Guild) meets, as well. I at first RSVPed that I would attend F. A. but since I looked at my calender, I realize I can not do both. It is important not to miss the first meeting of ANY class, even if you expect to miss some of the others. I have asked F.A. to reschedule  for another day of the week. There were five of us last time, and at least two of us are OASIS students.

I also take a Crazy Quilt class through the guild, and even though my Quilty Friend does not take that class, she knew this pattern was for me! It is from Canada Goose Designs and it is called CRAZY WEDDING RING. It is so unusual! It combines crazy quilting with TURNED EDGE applique! The pattern says to use all your machine stitches and make lots of rectangles, then using a petal shaped cutting template, cut them out. After that, use a finishing template, turn the edges. When a  background is selected and marked, baste the petals on to it, then applique. The pattern has it all done by machine which might be a great idea for the crib quilt size. I might start there. Since I am also in the machine quilting challenge--check my blog badge to the right--this will be a great excuse to learn some of my machine's stitches.
                                                

Can you see a tiny cardinal in a gilded cage? My Florida brother's family sent that along with this lovely vanilla shower gel and lotion. I sure smell good right now!

12.29.11

 Here is my green neck gaiter, also hand knit by Mom. It is so soft. The weather is chilling down now and I will get to wear it very soon.
I got ORANGE fabric from a quilty friend. How did she know my special affinity for orange? These three coordinates will make some pretty leaves or maybe fall fairy skirts...
I received a number of requested kitchen items but one item I did not expect was a rolly-mat! I have great office chairs and nice berber style carpet in my studio but they do not work well together. Now I have a chair mat and they slide along like a dream!
Sweetest Christmas card. This is a photograph of my Oregon brother's dog--with antlers! I guess most of my family are dog fanciers. Come back tomorrow and see what else there is!

12.28.11


Here are some of my Christmas goodies. A kit to make make my own ornaments. Anyone who knows me, knows this is something I really enjoy. I especially like beads and snowflakes.  What could be better than to have them both at once--AND I get to MAKE them!
You are not going to believe this, but this little felt bird has a hidden tape measure! There is a little leaf at his behind. If you pull it, you can measure things! 
I happen to love purple. I have since the 1970s. But not just any purple, this specific grapey lavender. I was pretty excited to open this hand knit neck gaiter made by Mom. There is a lovely green one, too, but you will have to wait to see that.
Someone made me a pincushion! It came with the cutest little pins. I especially like the pink/coral petals on this flowery pinwheel. One of my quilty friends made it and I love it.

12.27.11

What a wonderful holiday we had here in the mountains. Last year we were snowed in and had not heat or electric for Christmas Day. This year it was a little drippy but not much below 45F. We spent a quiet day in front of the fire place, missing absent family members and enjoying the dog with her presents. This year, for the first time in a long time, we had stockings to open. I even had one and I have not had one since my own parents stopped the tradition. Mine was made by a new friend in Canada whom I met through the stocking exchange. It was filled with exciting little surprises and sweet treats.

Canadian Maria made me a wonderful primitive/whimsical Stocking out of a a pretty brown wool tweed.
She hand appliqued a Santa and made a cute cotton fringe for the top.
 

And, look! He not only IS a stocking, he CARRIES one, too!
That sure is a lot of hand stitching. Don't you love those candy canes?

There were lots of goodies inside but you will not see any pictures of the sweet treats, they are gone!  She also made a cute Santa ornament for the tree--one inch squares and HSTs! (half-square triangles) I wish you could see the real thing. The face and beard are all different white on white and cream on white fabrics and the tan in the hat band has little tiny gold stars. I will probably not put this away with the Christmas things but keep it up here in my studio.


More tomorrow and maybe an update about our flying squirrels. The wildlife eradication team is scheduled for today. I promise not to photograph anything you would not want to see.

12.26.11

Happy Monday! Today's tea related picture is a Red and Ivory Cardinal Teapot.
Isn't that cute? It makes me cheerful just looking at it. Do you like the set?


12.25.11

CHRISTMAS 2011 STOCKING, part 9
 

Here she is with hair and make-up. I hand quilted and beaded her hair. She still looks wise and content.
Finished but not filled.


12.24.11

 CHRISTMAS 2011 STOCKING, part 8

Here are some pictures of Canadian Maria's stocking. I sure hope it got there by today. I had so much fun constructing it.
I assemble the tree separately and carry it around beading it for a couple of days.
Then I put it on the stocking fabric, sew the stocking and turn it, then fill in with beads the parts I left unbeaded near the seams.
After that, I re-interview fabrics. I had pulled a pile to consider but it is important to get an idea of scale as well as contrast.  For instance, I didn't want the hair color to overwhelm the skin or have the boots the first thing you noticed.  

 I choose a duo of pretty coral/red coordinates. For wings and star, I find a white that is spattered with silver. You can't really see that silver, can you?

I trace the parts on the wrong sides of the fabrics, stitch, turn and stuff. I sure love my hemostats.  I rely on them for turning and also for stuffing. I have several pair and I would be lost without them.
Remember the pattern I am using? Julie McCullough's ANGEL HAIR design. If you click the link you will see her version of it. In my earlier posts, I explained my modifications. PART ONE, PART TWO, PART THREE, PART FOUR, PART FIVE, PART SIX,  AND PART SEVEN.
Now you see the face turned, stuffed, and sculpted. She looks wise, doesn't she? If you have artistic experience, you know at a certain point in the creation, it starts to take on its own life and guides your hand. Decisions are made by you but the piece itself has the final word on the outcome. I found that to be true with basketry, doll making, bear making, quilting, spinning, knitting (unfortunately), and jewelry making. I tried pottery briefly but I fought the clay so much we never really got along. Anyway, she needs some make-up at this point but I wait a day or two until we are both ready.
The wings are fun. Instead of modifying the pattern and making voluptuous wings as I had intended, I went with the ones from the pattern. I enjoyed beading on the little star-shaped sequins and I was able to stay in the silver theme. I have a few multicolored star sequins and they looked wonderful on the fabric but the silver is more subtle and does not overpower.


You can not possibly imagine the trouble I had drafting the right sized star. That is all I will say about that.


12.23.11

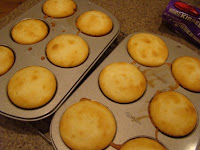
Last week I baked cupcakes. You know I do not care to cook, but I really did not mind doing this at all. Not only that, you KNOW I DO NOT USUALLY CARE FOR CAKE OR CHOCOLATE but this appealed to me--Coconut Cupcakes with a secret surprise! The next time I make them I am going to dip the frosting in shredded coconut and call them Dirty Snowballs!

First, prepare coconut boxed cake mix according to the directions and distribute the batter into paper lined cupcake tins. Set the timer for 5 minutes. Unwrap the appropriate number of Kisses. I found the Special Dark ones.
 

When the timer rings after 5 minutes have passed, place a kiss on the top of each cupcake. They will slowly sink in.  After awhile, I started putting them point down so they did not roll around to the side.
Then I put them back in the oven to finish baking. In my oven, that meant 13 more minutes but I already had my kisses unwrapped so the cupcakes hardly had time to cool down while I was working.
MMMMMMMMM. Delicious!